
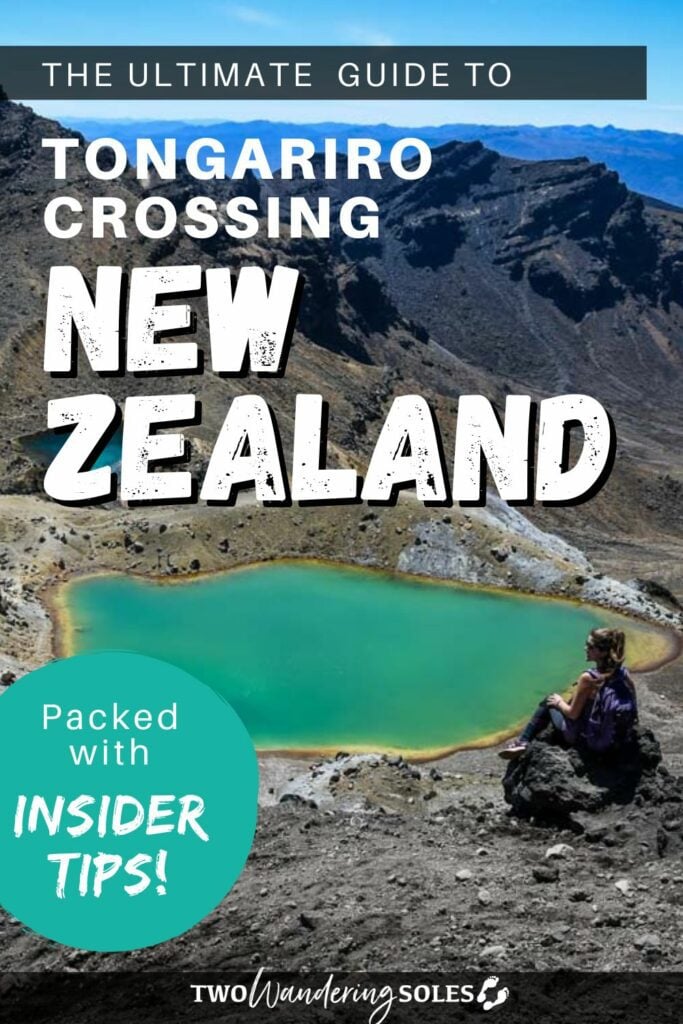
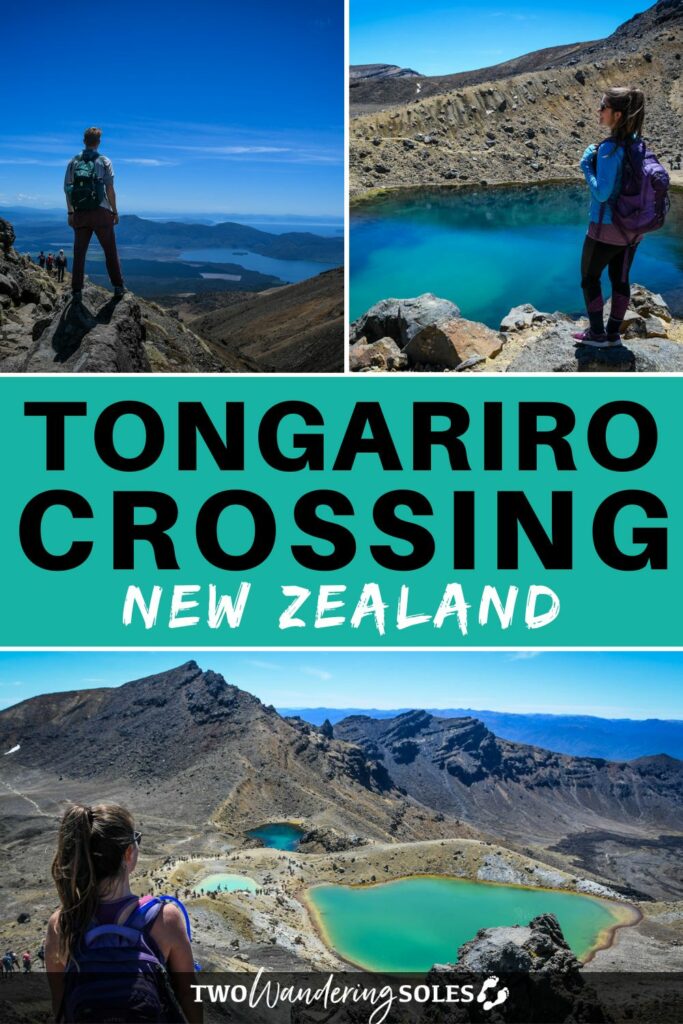
Vivid crater lakes, dramatic valleys, and snow-capped peaks await you along the Tongariro Alpine Crossing. Known as the “World’s Greatest Day Hike”, this trail was a highlight during our trip to New Zealand, and this guide will cover everything you need to do it!
Tongariro Crossing is known as New Zealand’s best day hike, and is well worth a spot on your North Island itinerary.
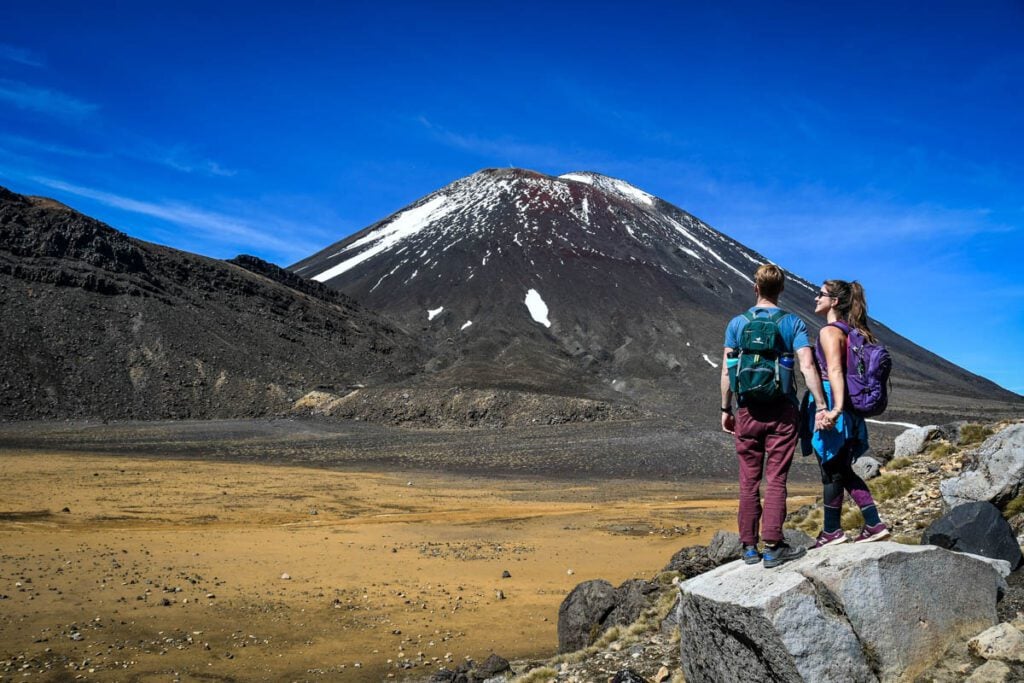
Located in Tongariro National Park, this trek hugs the saddle between Mount Tongariro and Mount Ngauruhoe (aka “Mount Doom” of Mordor), and brings hikers on a journey through otherworldly landscapes that shift from barren craters to old lava fields to glacial valleys.
On this trail, you can expect high winds, lots of company (aka other hikers!), and no shade or protection from the elements.
But if that doesn’t scare you off, you’ll be rewarded by being transported to a moonscape with active volcanoes looming in the distance, and vivid crater lakes that are unlike anything you’ve ever seen.
It is truly one of our favorite day hikes we’ve ever done.
Before you lace up your hiking boots, it’s worth pointing out that completing the Tongariro Crossing requires a fair bit of planning. You will likely need to book a shuttle for this point-to-point hike and you’ll want to be sure you have all of the essentials packed.
We’re sharing everything you need to know about the Tongariro Crossing so that you know what to expect and are prepared for one of the most memorable hikes in New Zealand.
Tongariro Crossing Hiking Guide
Jump to the following sections, or simply keep scrolling for the entire hiking guide.
- Tongariro Crossing overview
- Tongariro Crossing map
- Trail stats
- What to expect: Trail breakdown
- Facilities on the trail
- Shuttle & logistics
- Tips for hiking the Tongariro Crossing
- Best time to do the Tongariro Crossing
- Tongariro Crossing FAQs
- What to pack
- Where to stay nearby
- Things to do nearby
Tongariro Crossing overview
Looking for all the important info about this hike in one easy place? Here ya go!
- What: New Zealand’s best day hike
- How long: This 12-mile challenging point-to-point trail takes 6-8 hours on average to complete.
- Where: Located on New Zealand’s North Island in Tongariro National Park. The start of the trail is roughly 1 hour 20 minutes from Taupo, the nearest large town.
- Highlights: Active volcanic landscapes, spectacular crater lakes, and steaming geothermal vents
Logistics:
- Booking a shuttle is necessary
- Wear proper hiking shoes, layers and sun protection
- Pack at least 2 liters of water and plenty of food
Fun Facts about the Tongariro Alpine Crossing
- The Tongariro Crossing is often hailed as one of the best day hikes in the world.
- Tongariro National Park is the oldest national park in New Zealand and is a UNESCO World Heritage Site.
- You may recognize Mt. Ngauruhoe, better known as “Mount Doom” of Mordor, from The Lord of the Rings. This was a filming location for the famous trilogy.
- Ngauruhoe is the Maori name of the mountain and is pronounced nah-eh-ru-ho-eh.
Now that you’ve got the highlights, continue reading for all the important information.
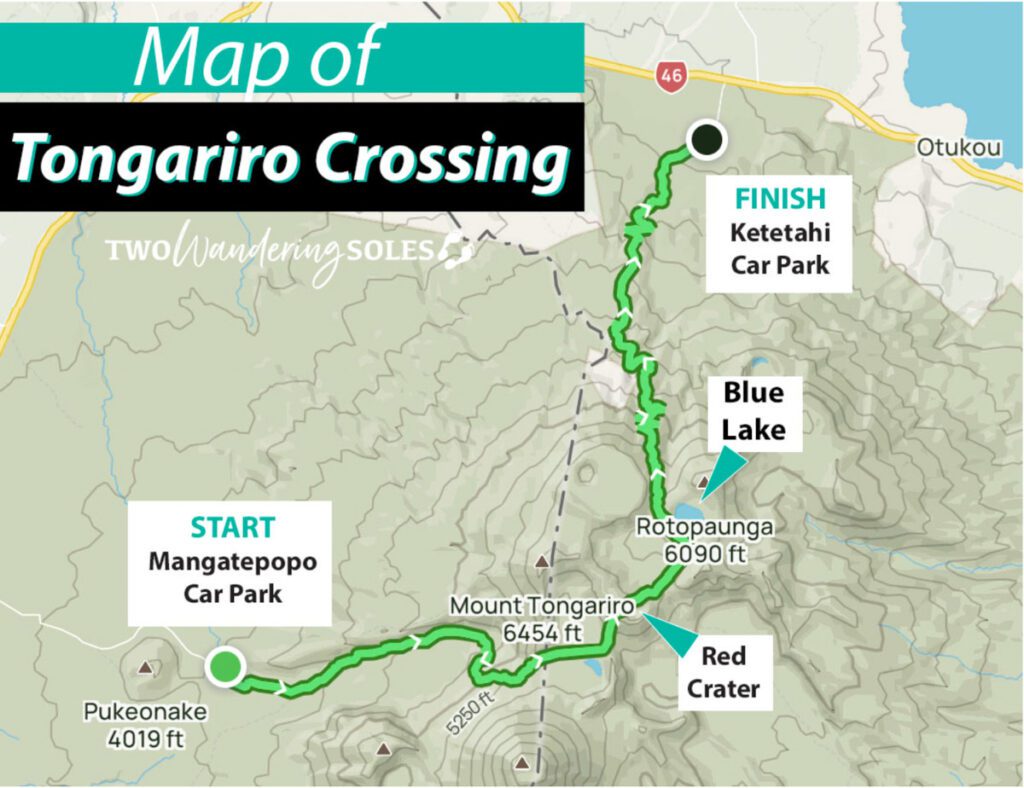
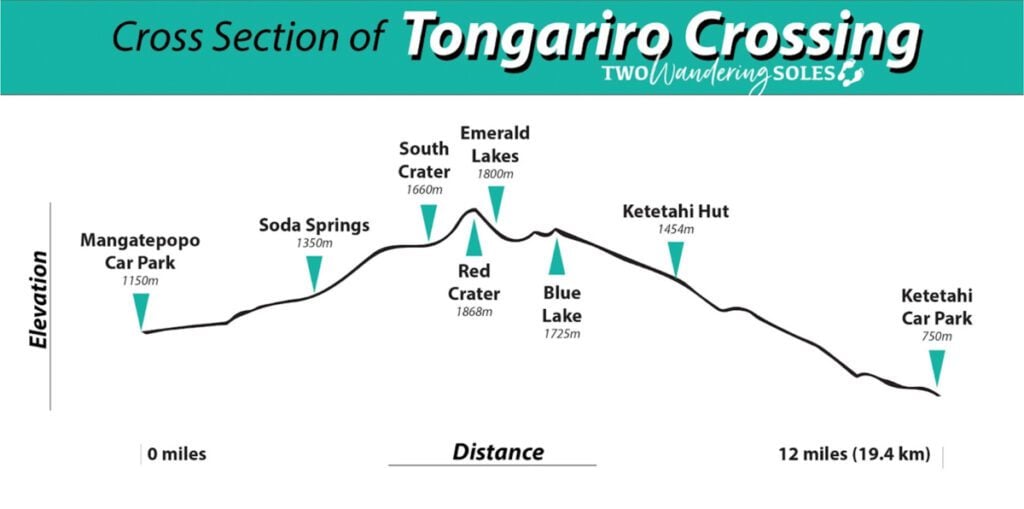
Tongariro Alpine Crossing map
Tongariro Alpine Crossing hike stats
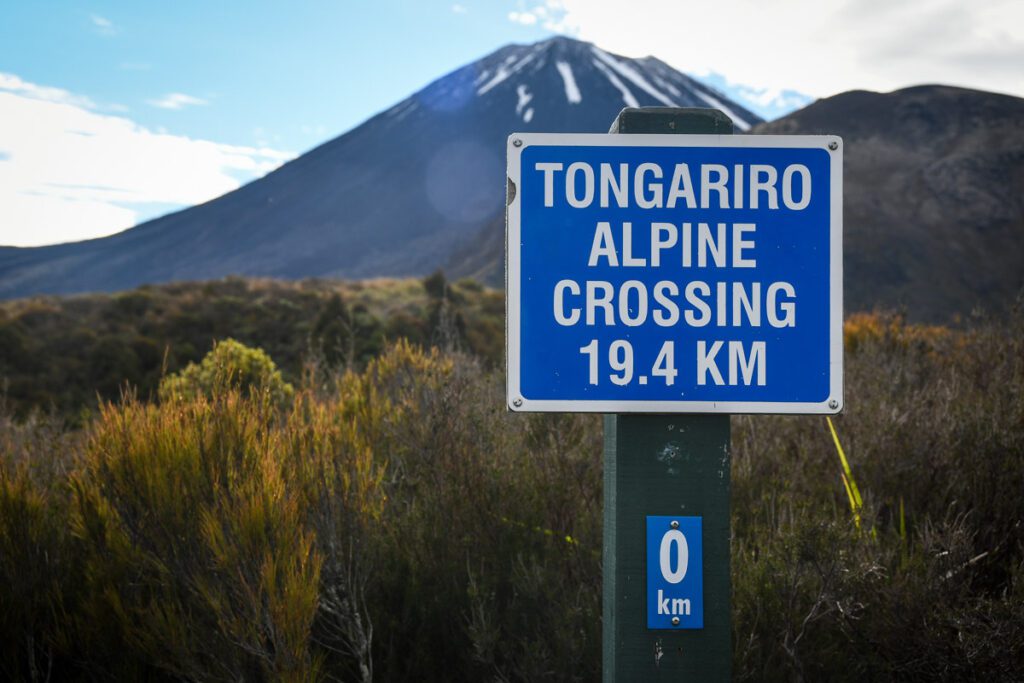
- Distance: 12 miles (19.4 km)
- Type of hike: Point-to-point
- Elevation Gain: 2,759 feet (841 meters)
- Difficulty rating: Hard
- Trail conditions: mostly well-maintained, but there are sections of rocks and volcanic ash that are rough
- Time: average of 7-8 hours (can range from 6 -11 hours, depending on your pace)
- Location: North Island New Zealand, within Tongariro National Park
- Dogs: Not allowed on this trail
- Drones: Not allowed on this trail
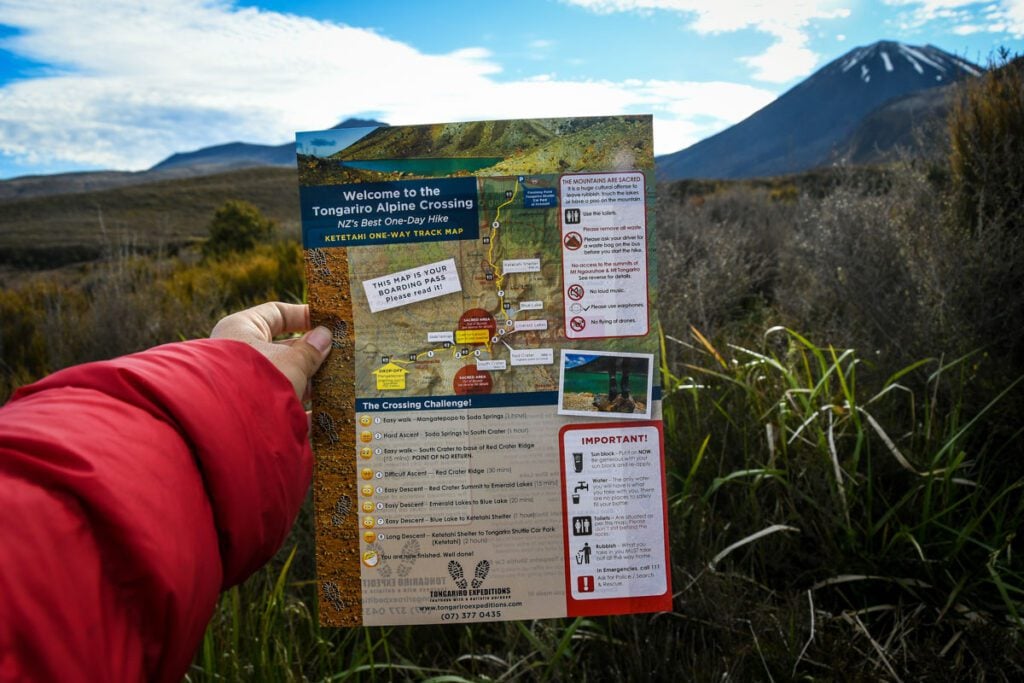
What to expect on the Tongariro Crossing hike
We’ve broken this trail guide up into 6 sections so you know what to expect along the way.
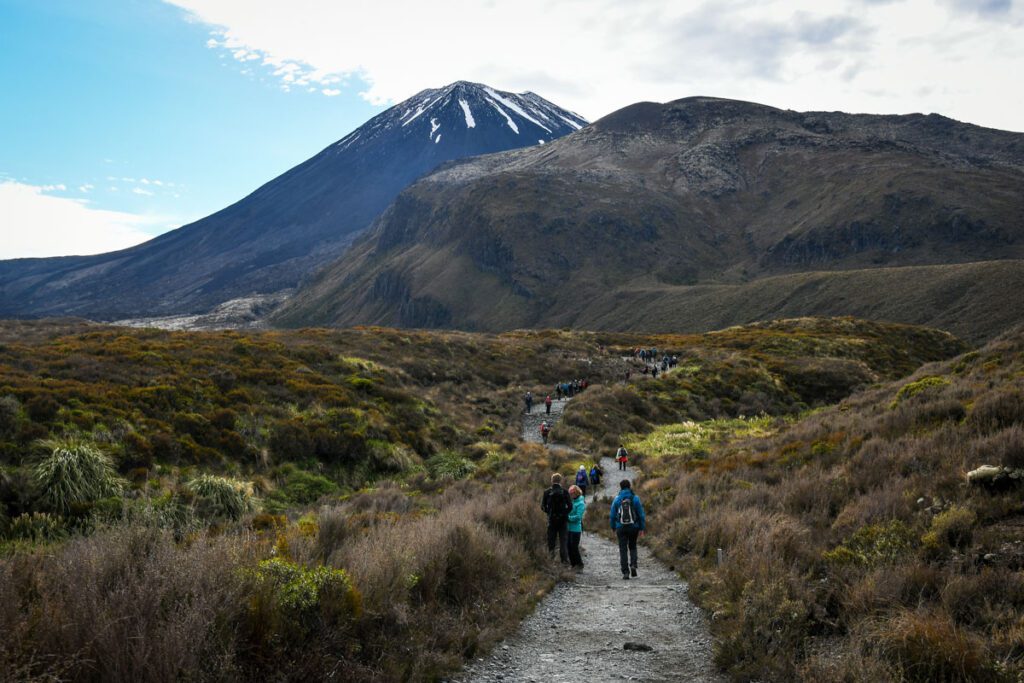
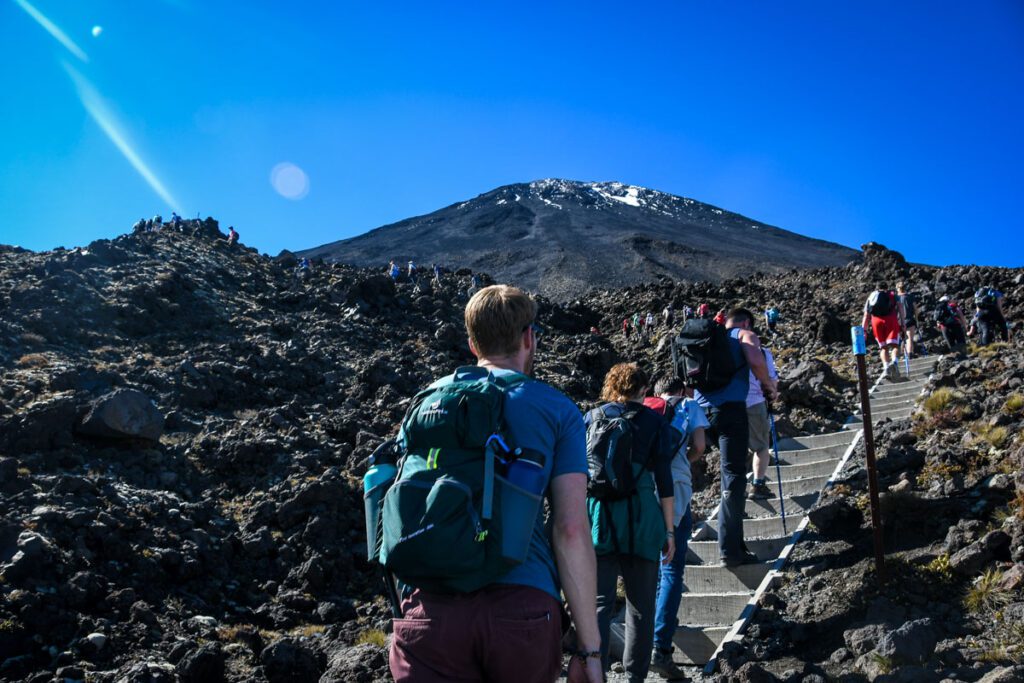
Part 1: Mangatepopo to Soda Springs
- Difficulty: Easy and flat
- Time: 1 hour
After you’re dropped off at the end of Mangatepopo road, you’ll start on a flat boardwalk weaving along a small stream through barren landscapes and old lava flows, all of it illuminated by the sun peeking over Mt. Ngauruhoe.
Just before you hit a mile, there will be a trail leading to the right to Whakapapa Village. Continue straight. You’ll hike for a few more minutes before coming to another trail spur on the left that leads to Mangatepopo Hut and restrooms.
Stop at the hut if you need, then continue on the main trail to Soda Springs.
Good to know: If you start hiking this portion and the weather gets poor, turn around because the weather will only get worse as you travel up the valley.
Optional side hike to Soda Springs: Add an additional 15 minutes to make a side trip to Soda Springs waterfall, which is very pretty. You’ll find the most vegetation on this hike at this spot, as well as a boggy area.
Part 2: Soda Springs to South Crater
- Difficulty: Challenging uphill
- Time: 1 hour
As the trail veers to the right looking towards Mt. Ngauruahoe, you’ll begin the steep climb up the Devil’s Staircase to the South Crater.
From Soda Springs to South Crater is 1400 to 1600 meters (4593 to 5250 ft). This is a steep ascent, but moderate as long as you pace yourself and take it slow.
On clear days, you can see immaculate views down the valley and into the countryside. If you’re lucky, you can enjoy some eye-candy of Mount Taranaki in the distance as you stop to rest.
Although the volcanic terrain is uneven in this section, there are actual steps in place that will provide sound footing for you on the way up.
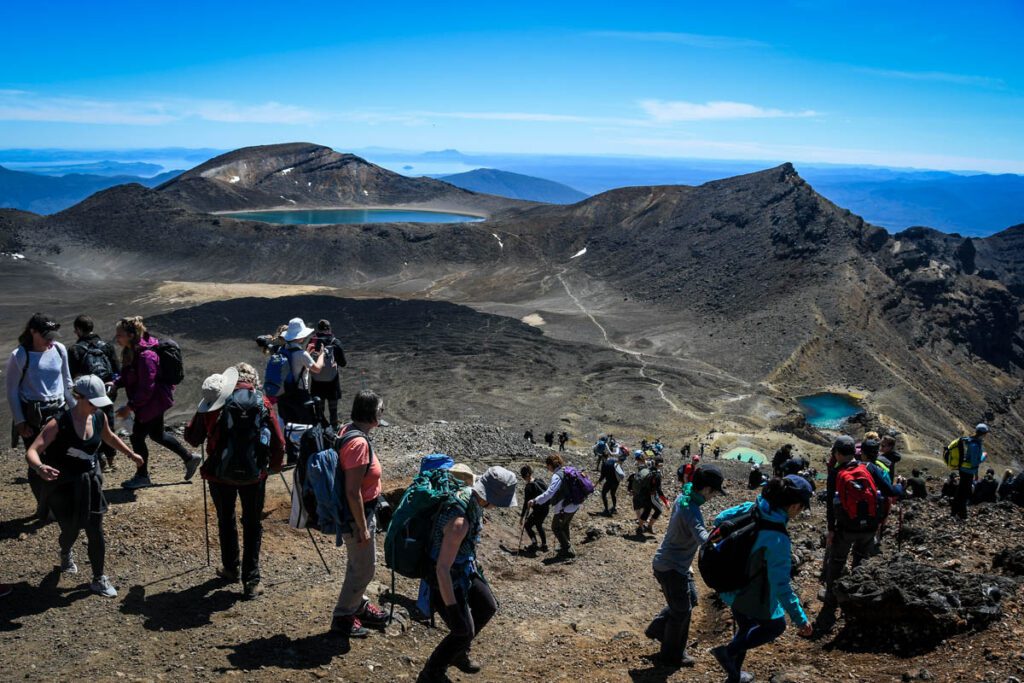
Part 3: South Crater to Red Crater Summit
- Difficulty: Starts flat and easy, but finishes with a the most challenging incline of the hike
- Time: 1 hour
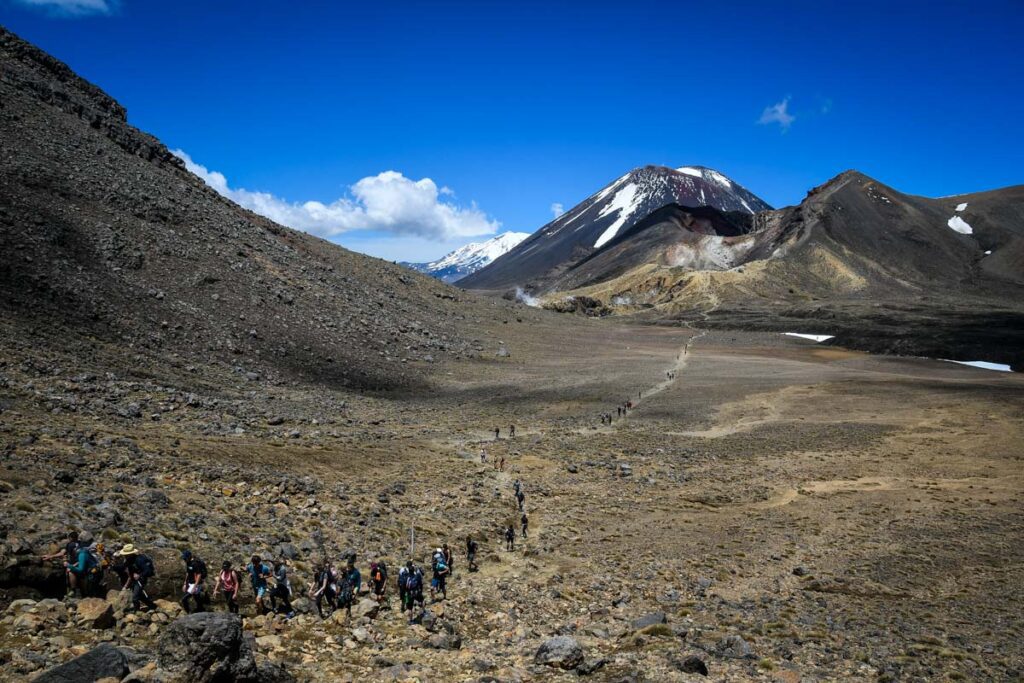
The trail to the Red Crater is mostly a wide, flat plain with the ridge of Mt. Tongariro on your left and Mt. Ngauruahoe towering to your right.
You’ll pass by a small, unnamed lake just before the steep section to the crater summit.
The lake is a great place to stop for a snack and drink, and gather your bearings before the toughest portion of the hike. It’s nicknamed “the point of no return”, so if the weather is spotty or you’re struggling thus far, this is where you’d want to turn around.
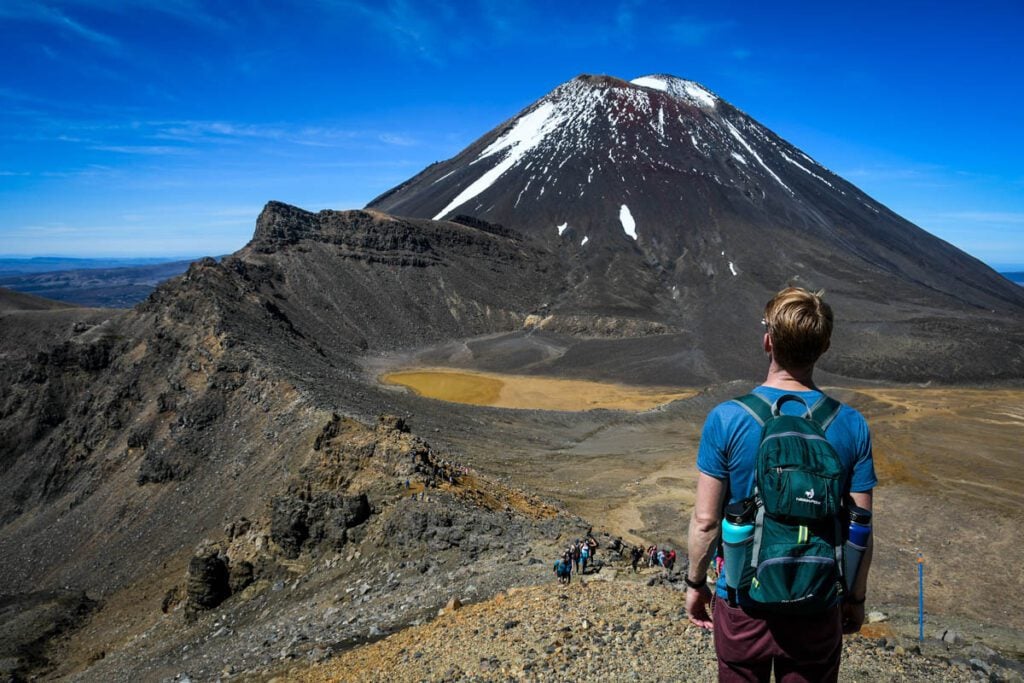
If you’re feeling good, you’ll follow the steep climb up an exposed ridge to the top. There is a small spur trail (about 0.5 miles there and back) to the right that goes around the edge of the Red Crater and is especially beautiful if you don’t mind the extra mileage.
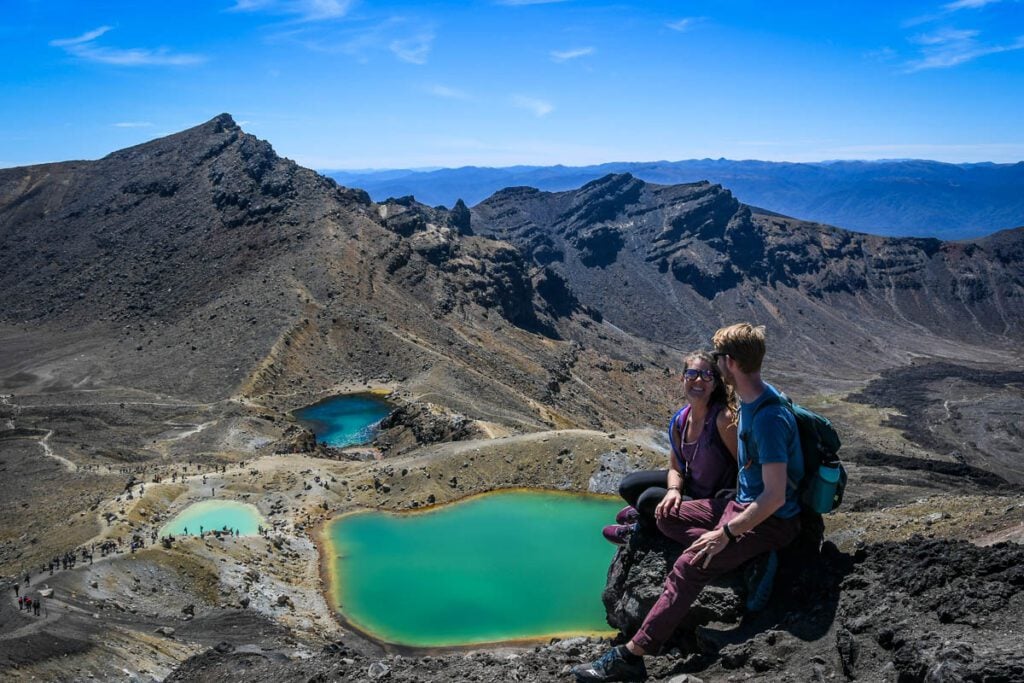
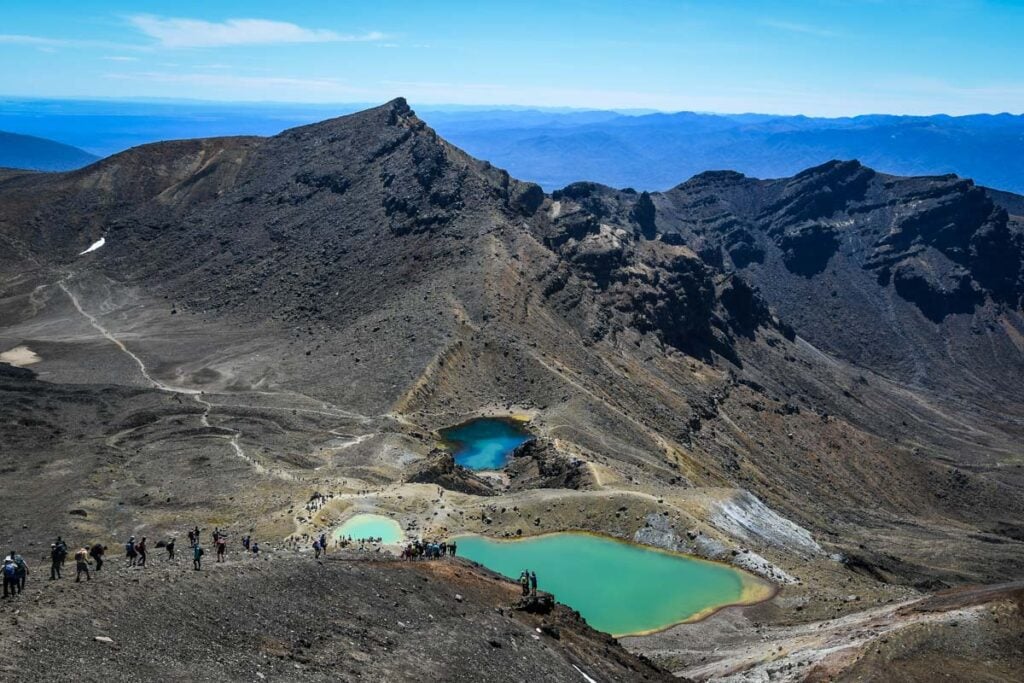
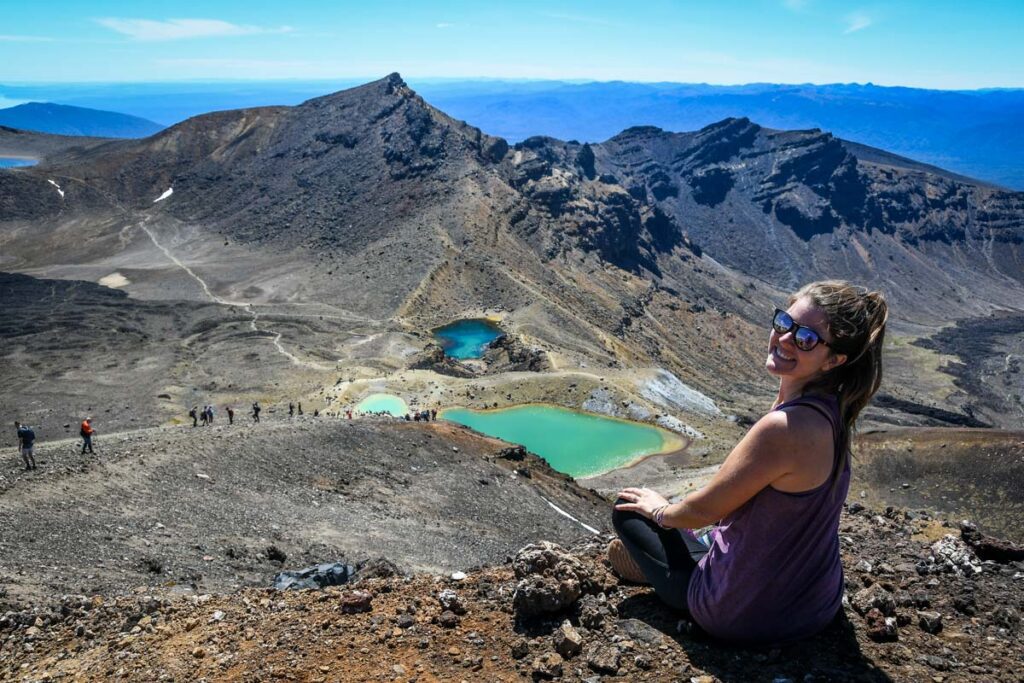
From the top, lookout at Otuere Valley, Rangipo Desert, Kaimanawa ranges, and downwards towards the Emerald Lakes.
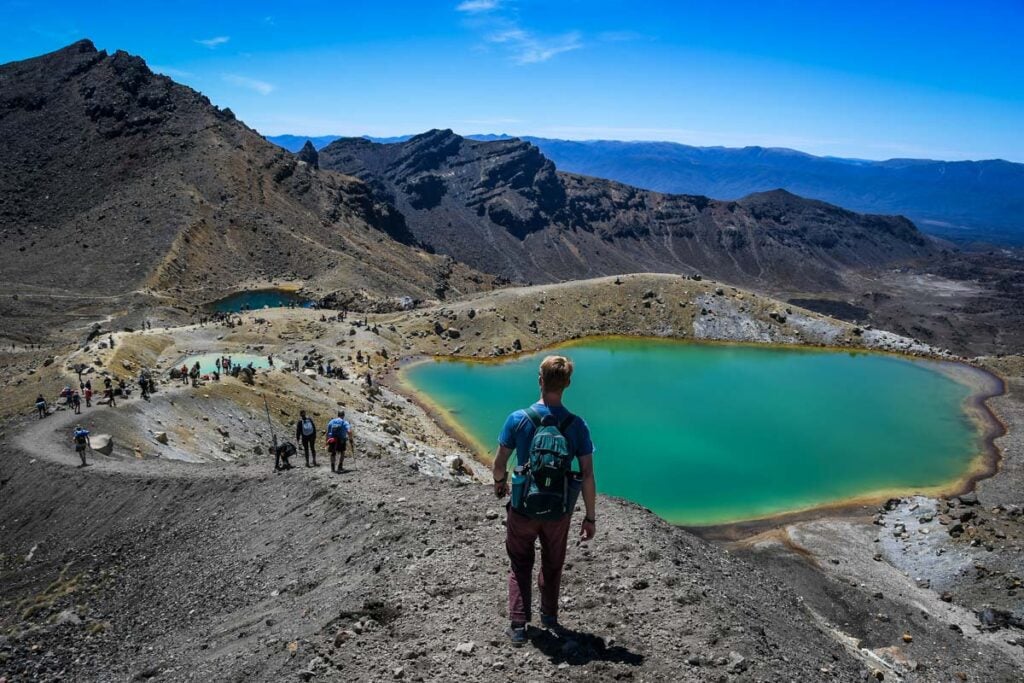
Part 4: Red Crater Summit to Blue Lake
- Difficulty: Challenging as you descend on a rocky and unsteady path
- Time: 30 minutes
The descent to Emerald Lakes is short, but requires steady footing since the trail is loose scoria and can move quickly and unpredictably if you’re not careful.
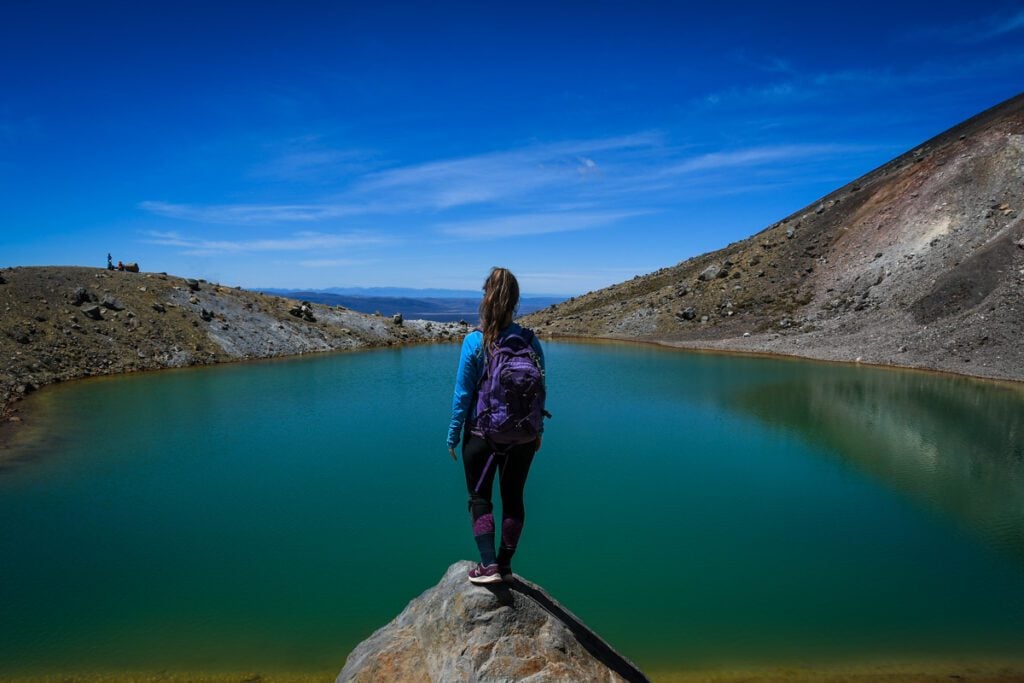
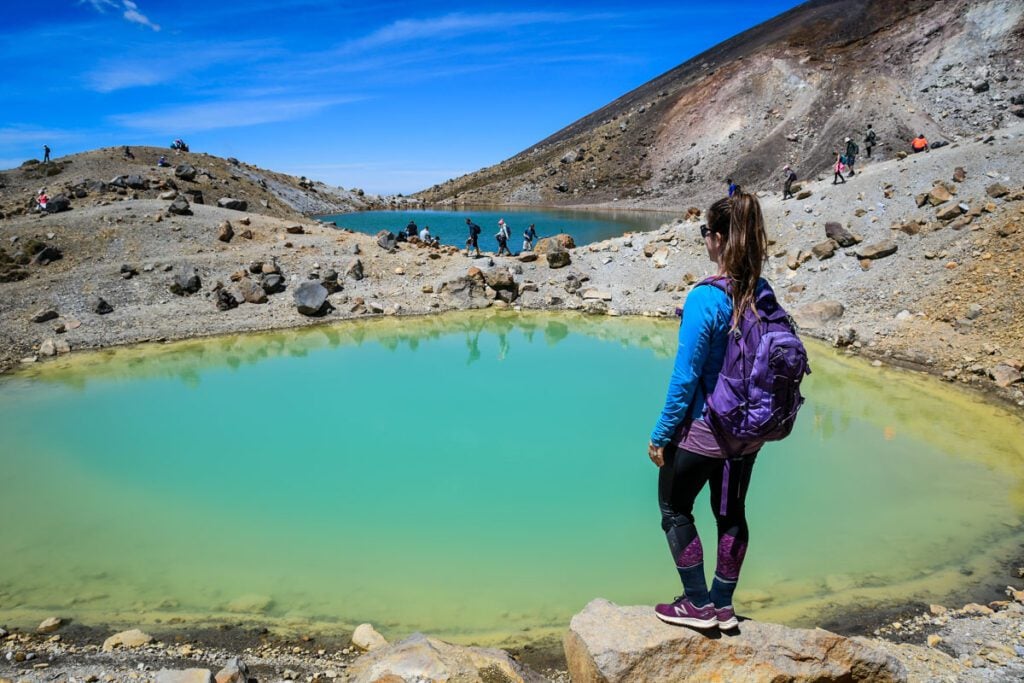
As you navigate the descent, you’ll see old lava flow from the Red Crater on your left and the Emerald Lakes on your right. The lakes have their brilliant color from the minerals of the rocks in this area.
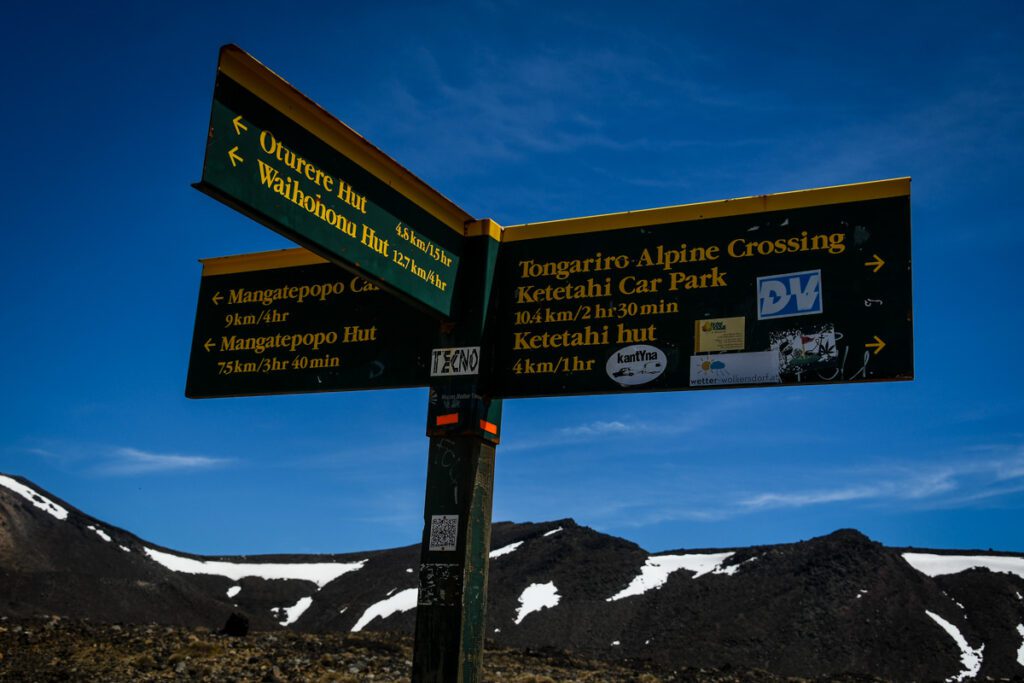
Just past the lowest lake, the trail to the Otuere Hut branches off to the right along the Tongariro Northern Circuit.
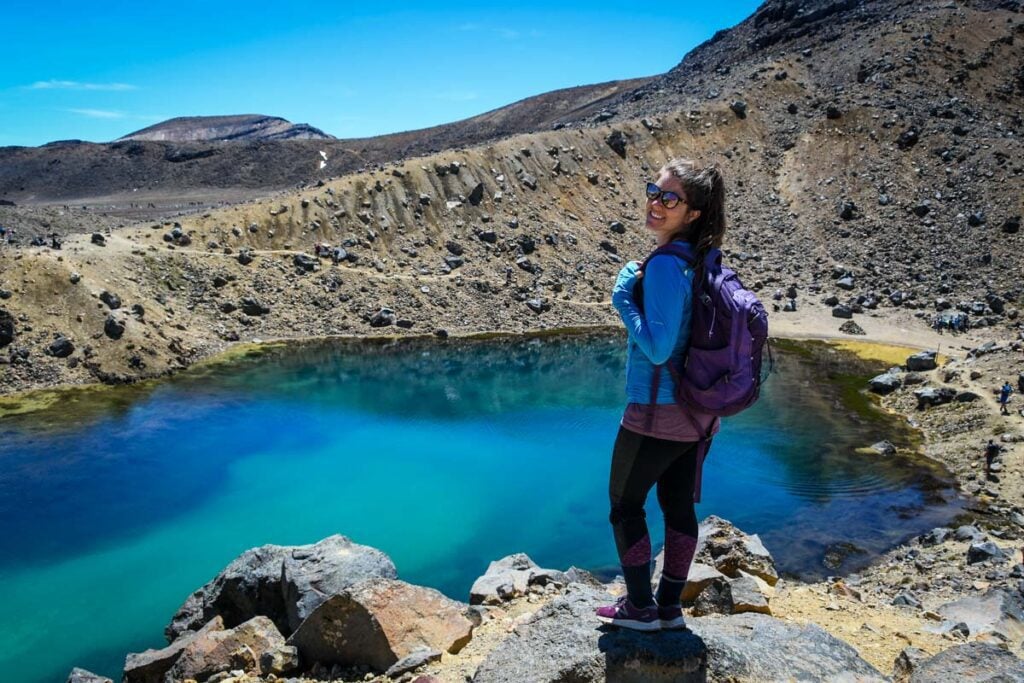
The Tongariro Alpine Crossing hugs the edge of the Central Crater and takes you to the sacred Blue Lake. Note it’s considered disrespectful to touch, eat, drink, or enter this cold acidic lake.
A word of caution: There is a lot of geothermal activity along the Tongariro Alpine Crossing, particularly in this area with the emerald lakes. The steam vents (fumaroles) are extremely hot and the ground around them is unstable. Stay on the trail and do not approach them as you can get severe burn injuries.
Good to know: This section of the trail tends to bottleneck with people. Be patient and careful on this somewhat tricky descent.
Insider Tip: Factor in additional time for photos in this section, as it is the most iconic part of this hike. It is also a great spot for a lunch break!
Part 5: Blue Lake to Ketetahi Hut
- Difficulty: Moderate
- Time: 1 hours
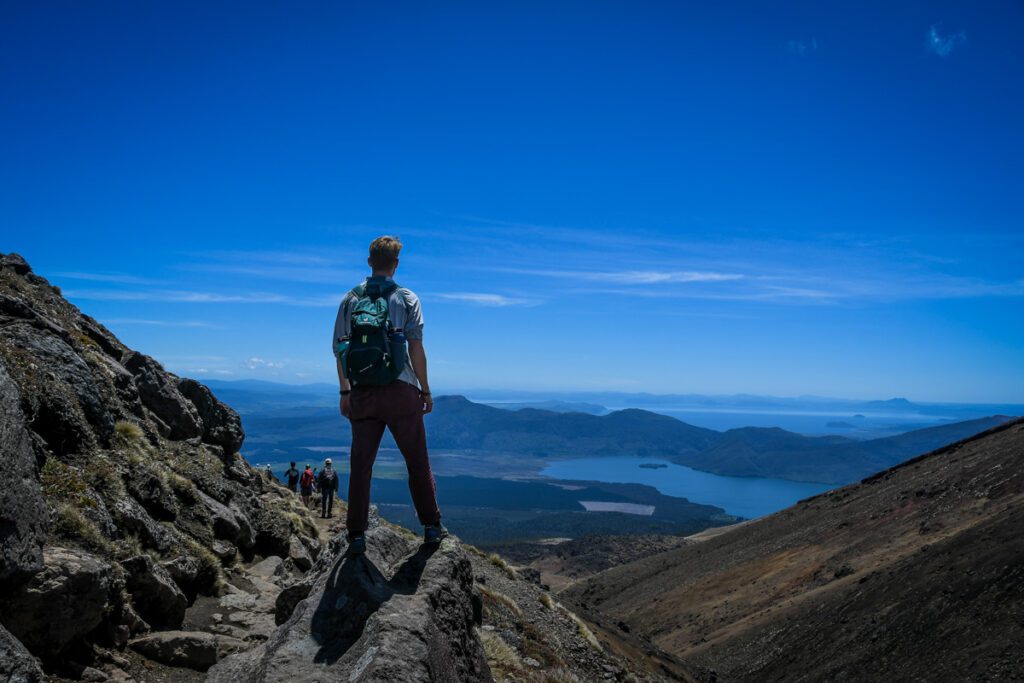
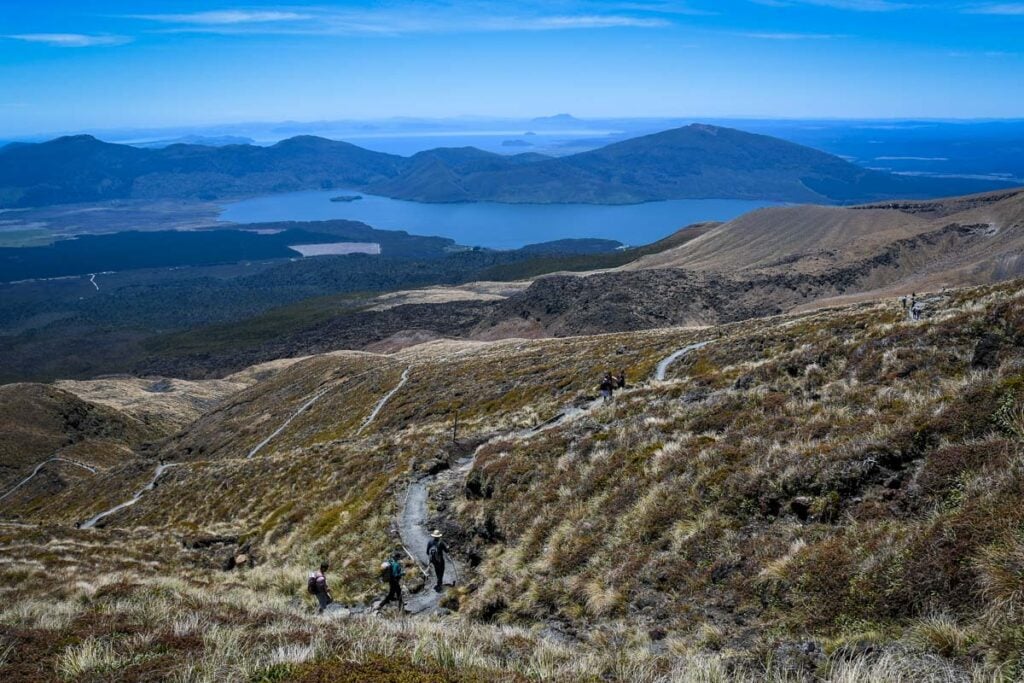
Great news- from Blue Lake the trail is all downhill and zig zags through the Rotopaunga Valley along the North face of Mt. Tongariro.
You can see the Ketetahi Hut during your entire descent. On clear days, you can enjoy views of Mt. Pihanga and Lake Rotoaira over Lake Taupo.
The Ketetahi Hut was once part of the Tongariro Northern Circuit, but was damaged during an eruption at Te Maari craters in 2012 and was removed. Don’t fear though, there are still toilet facilities here.
Good to know: the pumice-based terrain around the trail can be marshy and eroded easily, so please stay on the poled route.
Part 6: Ketetahi Hut to Ketetahi Car Park
- Difficulty: Moderate (gradual descent, but it seems to go on forever!)
- Time: 2 hours
The last segment of the Tongariro Crossing traverses through a variety of different topography before you enter a hardwood forest and follow a stream to the exit.
This section can get rather monotonous since the best views are behind you. You’ll find the “are we there yet’s” will cross your mind more than once.
Good to know: Don’t be fooled by the sign at Ketetahi Hut that claims it’s 1.5 hours to the car park… It’s closer to 2 hours as we mentioned.
Important note: Ketetahi Springs are on private land and hiking the circuit does not allow you access to them.
Facilities on the Tongariro Crossing
While the Tongariro Alpine Crossing is quite popular, the facilities on the trail are somewhat minimal. Here is what you can expect…
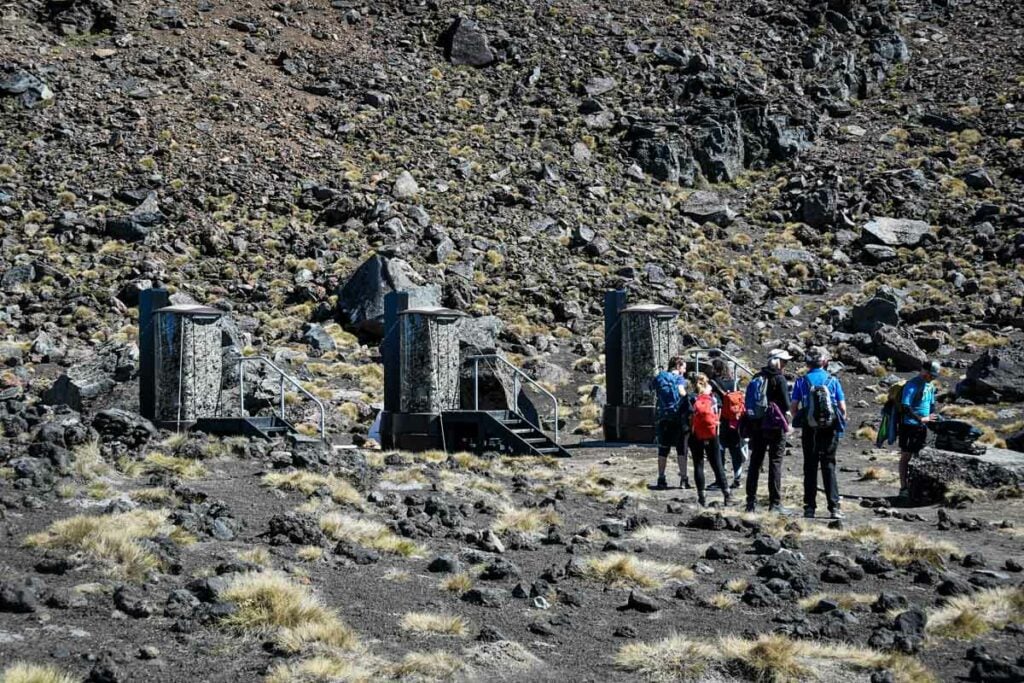
Toilets
Along the trail, there are 8 different stops with toilets (porta-potties). The main clusters of 3-4 toilets are at Mangatepopo starting point, South Crater, right after Blue Lake, and at the Ketetahi Shelter.
They do come with toilet paper, but we recommend packing your own incase it runs out. We also recommend bringing your own hand sanitizer.
After Blue Lake, the restrooms tend to get pretty busy after lunchtime, so try and go before South Crater or after Ketetahi Shelter to avoid waiting in a long line.
Garbage
There are no trash bins on the trail, so you will need to pack everything out with you. Bring a bag for your rubbish, and pick up any you see along the trail that others have left behind to earn some karma points!
Water
There is no potable water on the trail. This means you will need to carry all the water you will need for the hike. We’d recommend bringing at least 2-3 liters of water per person. A hydration bladder is the easiest way to carry the appropriate amount of water for a hike of this distance.

Logistics of the Tongariro Crossing: Shuttles & How to get there
The Tongariro Crossing is a unique hike because it starts and ends in different places. This means you need to arrange transportation in advance.
It can be a little confusing, so we’re here to walk you through your options.
Tongariro Crossing:
- begins at the Mangatepopo Car Park
- ends at the Ketetahi Car Park
Here are the 2 best shuttle options:
Option #1: Park at Ketetahi Car Park + one way shuttle (our recommendation)
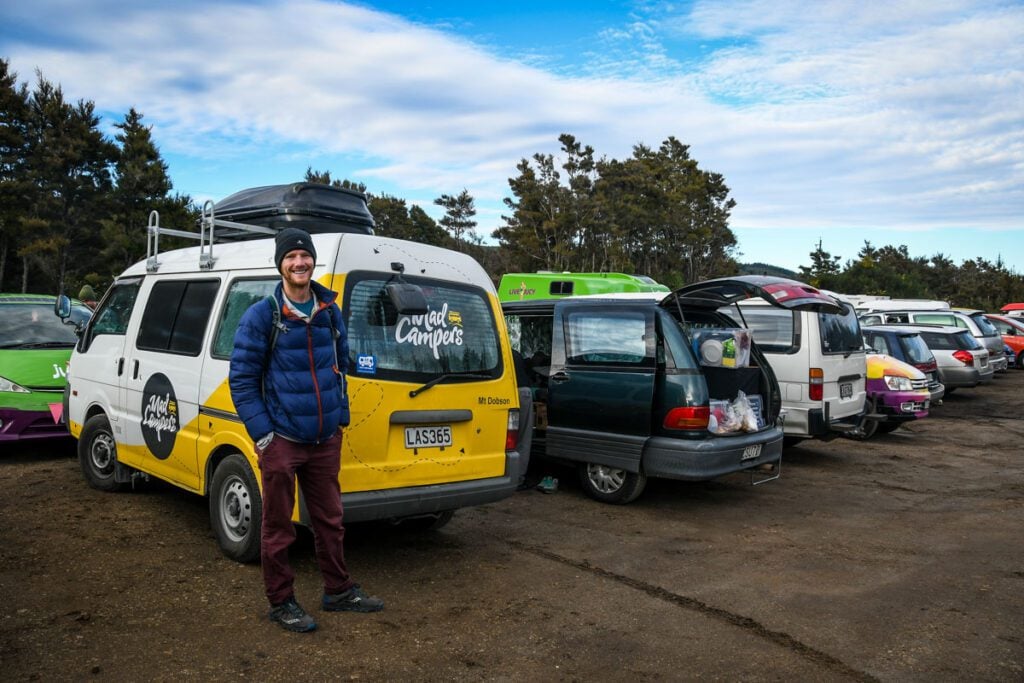
If you have a vehicle of your own, this is the option we recommend.
Not only is this cheaper than the 2-way shuttle from Taupo, but the biggest perk to this option is that you won’t need to rush your hike in order to catch your return shuttle.
You will drive to the Ketetahi Car Park (aka the END of the trail). From here, you will catch a shuttle to the trailhead (Mangatepopo Car Park).
Once you complete the crossing, you will be a short, 10-minute walk back to your car. No need to stress about catching a shuttle in time and rushing your hike.
- Cost: $45 NZD ($28) per adult
- Reservations are necessary (during peak season, the best departure times can book up in advance)
Can I park at the trailhead (Mangatepopo Car Park)?
There is a 4-hour time limit at the Mangatepopo car park, meaning you cannot park here and do the entire trail. You could hike a portion of the way, but most people will not be able to park here for the duration of their hike.
Option # 2: Take a two-way shuttle from Taupo
Even if you don’t have a rental car in New Zealand, you can still do the Tongariro Crossing!
There are shuttles that depart from Taupo and will bring you back later in the day.
The negative about this option is that you will need to be sure you are watching the time during your hike, as you won’t want to miss your return shuttle. That said, if you’re a fast hiker, you might find yourself waiting around a bit before a shuttle will be there to pick you up.
- Cost: $1200 NZD ($75 USD) per adult
- Reservations are necessary (during peak season, the best departure times can book up in advance)
Alternative: If that company is fully booked for your dates, try this shuttle service. The round trip shuttle picks up and drops off in National Park, about a 20 min drive from Tongariro.
Is it possible to do this trek without taking a shuttle?
Yes, it is possible to do this trek without the shuttle:
- Do half of this hike as an out and back. Hike from the Mangatepopo parking lot to Blue Lake, and back to your car. In total, this is roughly 13 miles. This means you won’t do the entire trek, but you will see the most iconic views. The upside is you won’t need to plan or pay for a shuttle.
- Park one car at the beginning and one car at the end. If you live in New Zealand or are traveling with friends and have two vehicles, you could place a “shuttle car” at the end.
→ Love hiking? These jaw-dropping bucket list trails around the world deserve a spot on your adventure list!
Tips for hiking the Tongariro Crossing
We’ve gathered these insider tips from our personal experience hiking the Tongariro Alpine Crossing.
1. If you have a return shuttle, watch the time so you don’t miss it
The shuttles are typically on time and they leave on time. You won’t want to miss it, so you’ll want to pace your hike accordingly.
‘Nuff said.
2. Don’t skimp on food, water and layers

There is no opportunity for food or water fill ups along the way, so you’ll need to carry everything you need with you. Be sure to stock up on food the night before your hike.
3. Start as early as possible
The earlier, the better. This is a popular hike, and the later you wait, the more crowded it will get.
4. Wear proper hiking boots
Being that you will be making some lengthy descents, some over loose gravel and ash, you will want to have proper ankle support.
Be sure to wear boots that have been worn in, as this is a long trail and the way down can especially be hard on your feet if you don’t have comfortable footwear.
5. Don’t forget your sun protection
One of the things to know before you travel to New Zealand is that there is a hole in the ozone layer above NZ and Australia, so you will burn much easier than in other places.
Layer on the SPF, wear layers and a sun hat. Sunglasses are also essential on this hike!
6. Check the weather before your hike
The weather along the Tongariro Crossing is notoriously unpredictable, and high winds and poor conditions can make this trek dangerous. Be sure you know what to expect and prepare accordingly.
A local rule of thumb is that if Mount Egmont (Taranaki) has weather, it will be in the park in the next two hours. If you cannot see the mountain at all, be prepared for bad weather.
Best time to hike Tongariro Crossing
Technically, you can hike Tongariro Crossing anytime of year, but it’s best hiked in good weather from November to April.
Summer is the most popular time to hike Tongariro Crossing since your odds of favorable weather are higher. With that being said, expect crowds since it’s peak hiking season.
Shoulder seasons are a good option if you want to avoid crowds and cooler weather, but there are higher chances of rain. Always check with your shuttle provider the day before you plan to hike to make sure the trail is open and in good hiking condition.
While winter is beautiful, the entire area is blanketed in snow and requires an ice ax and crampons to cross safely. The trail is also only marked by signs, so if there is low visibility, there are higher risks of getting lost.
Psst! New Zealand is a very diverse country with many pros and cons to visiting in each season. Read our guide on the best time to visit New Zealand for a well-rounded and detailed breakdown of each season.
Tongariro Crossing FAQs
Still have questions about this trek? Read through some of the most common questions (and the answers!) below.
How long does it take to hike the Tongariro Crossing?
On average, this trail takes 7-8 hours to complete.
It can range anywhere from 6-11 hours depending on your pace and how many photo stops and breaks you take.
What is the hardest part of the Tongariro Crossing?
This question is subjective and will depend on you.
The three sections that we think are most difficult (for different reasons) are:
- Steep incline to the ridge of Red Crater: This is the steepest part of the hike and will have your glutes burning! That said, compared to other hikes we’ve done (like Everest Base Camp and the Inca Trail), this isn’t too bad.
- The descent from Red Crater Summit to Emerald Lakes: This portion of the trail is full of loose gravel, ash and scree. You can easily lose your footing, so it’s important to go slow. We found digging our heels in or stepping sideways helped. The other frustrating part about this section is that it tends to bottle neck and it gets crowded. That said, this is the start of the decline (no more crazy inclines from this point on!) and the views are some of the best you’ll have on this trail.
- The gradual decline from Ketetahi Hut to the parking lot: This portion shouldn’t feel that difficult, but it seems to go on forever. I usually like downhills, but this one started to get old and made my knees and toes hurt. Just be prepared for it to drag on and maybe it won’t feel that bad!
Is the Tongariro Crossing crowded?
This is a popular trail year round. It is most crowded during peak (summer) season.
Shoulder seasons and winter are less busy, and the earlier in the day you leave, the fewer people you will encounter on the trail.
The most busy section of this trail is the descent from Red Crater Summit to Blue Lakes. This area tends to bottleneck as it is narrow and can be slow-going since the trail consists of loose gravel at this point.
Can you hike the trail in reverse?
Yes, but plan to add an additional hour onto your expected hiking time because there is more elevation gain if you go in reverse.
You will also need to plan your transportation, as most shuttles collect hikers from the Ketetahi side.
Can you summit Mt. Ngauruhoe and Mt. Tongariro?
In the past, people were allowed to summit these peaks. However, these are sacred mountains to the Maori people, so climbing Mt. Ngauruhoe and Mt. Tongariro is no longer permitted.
What to pack for the Tongariro Crossing
- Water: hydration bladder with at least 2 liters of water per person (we’d recommend 3 liters)
- Comfortable hiking backpack
- Food: plenty of hiking snacks and lunch for on the trail
- Sun protection: sunscreen, hat and sunglasses (this trail is completely exposed, with no shade)
- Hiking boots with decent ankle support
- Layers
- Waterproof rain jacket: choose one that also works as a windbreaker, if possible (this trail is notoriously windy!)
- Gloves and a beanie: these are nice to have when you start the trek early in the morning when it’s really chilly
- Hiking poles (optional)
- Chapstick: it is often very windy on this hike, so you’ll thank me!
- Headlamp
- Mini first aid kit
- Camera and tripod (optional – this is our go-to tripod for hiking and travel)
- Toilet paper: it’s a good idea to bring a bit of TP just in case as the toilets along the trail often run out
- Hand sanitizer (we love this one from Dr. Bronner)
- Phone & map: be sure to download the offline version of the map on Alltrails+ so you can track your progress
- Power bank: to keep your phone charged

Where to stay near Tongariro Crossing
Many people doing the Tongariro Crossing stay in the nearby town of Taupo. It is an easy choice, as many of the shuttles will bring you to and from Taupo.
Free camping near Tongariro Crossing
If you’re traveling New Zealand by campervan (highly recommend it!), we’d advise you to camp near the trailhead, then drive your car to the Ketetahi Car Park and take a one way shuttle to the trailhead.
There’s a cluster of very basic DOC Freedom camping sites in the Kaimanawa Forest Park, just about 3 km off of Hwy 1. Try to get there about an hour or so before sunset so you can find a good spot. You’ll be able to see the campsites on the Rankers App.
These are bare bones site with dirt parking lots, no electricity and drop toilets.
Paid camping near Tongariro Crossing
- Tongariro Holiday Park: doesn’t have the best reviews, but it’s close to the trail and there is a return shuttle option
- Crossroads Overnight Praking: very basic but the owners run a shuttle service
- Whakapapa Holiday Park: Stay a short drive away from the trailhead nestled in lush New Zealand bush. This campsite has a fully-equipped kitchen, bathroom, laundry room, wifi, and shuttle directly to Tongariro Alpine Crossing.
Hotels near Tongariro Crossing
There are endless hotels and stays near Tongariro National Park that will give you the ultimate crash pad after this challenging day hike.

Baycrest Thermal Lodge: With panoramic views over Lake Taupo, these self-catering apartments have rooms with a private hot tub, full kitchen, wifi, and laundry facilities.
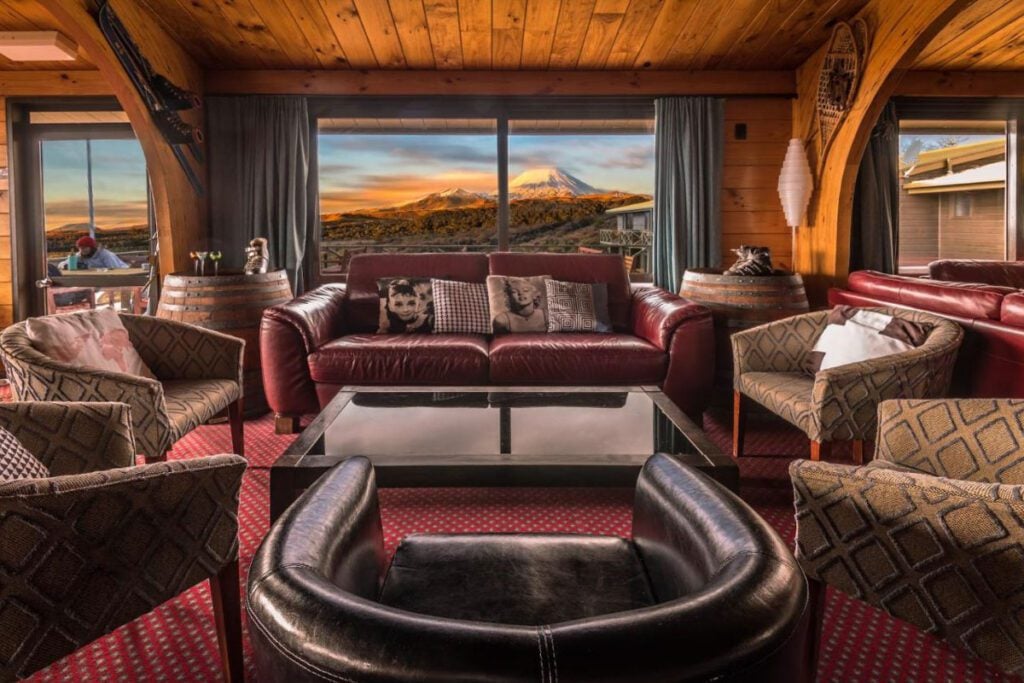
Skotel Alpine Resort: In the heart of the National Park, this resort has everything from backpacker accommodation to full cabins with an abundant list of amenities.
More things to do near Tongariro Crossing
- Refuel with burgers at Pauly’s Diner in Taupo or indulge in a nicer dinner at Hare & Copper Eatery, which is located in Turangi (not far from the trail).
- Check out Tawhai Falls (aka “Gollum’s Pool”), which is one of the filming locations for the “Lord of the Rings”.
- Make the hike to the stunning Taranaki Falls.
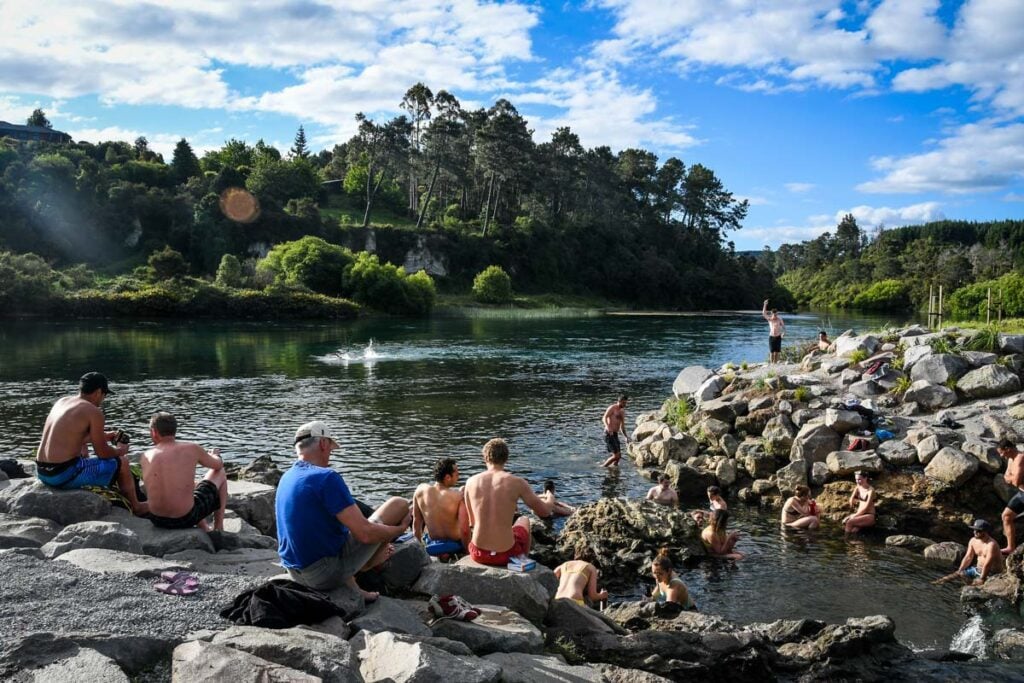
- Explore the town of Taupo, which has a variety of world cuisine, lake activities and hot pools.
Plan your trip to New Zealand
We have TONS of resources on travel in New Zealand and destinations throughout the country. Check out our Ultimate New Zealand Travel Guide for all the answers to your most burning questions, and read some of our favorite articles below.
- Start with our guide to the best time to visit New Zealand so you can pick the perfect season for your adventure.
- Don’t miss these essential New Zealand travel tips — seriously, some of these will save you major headaches!
- Get inspired with our list of exciting things to do in New Zealand for first-time visitors.
- Planning your route? Our ultimate campervan trip planning guide covers everything you need to know before you hit the road.
- Trying to find the best rental? We’ve done the research for you and created a guide for the best campervan rentals in New Zealand.
- Lace up your boots and hit some of the best hikes in New Zealand — complete with local tips!
- Visiting Milford Sound? Check out our Milford Sound travel guide, including essential planning tips.
Want the perfect New Zealand itinerary planned for you?
We traveled in NZ for about 5 weeks and were able to visit most of the highlights of the country, including both the North and the South Island. We did almost all of the experiences on this list!
We took our 5-week travels and condensed it down to 30 days because so many people wanted a 1-month route. We’ll send you our completely done-for-you 1-month itinerary, filled with tips and advice. Just click above to get your 30-day New Zealand road trip itinerary today!
If you like doing the research, all the power to you! Feel free to use our FREE itinerary outlines as a starting point as well as our destination guides for ideas of things to do (we’ve got a bunch of them!):
Don’t miss your chance to grab our New Zealand packing list!

In this FREE New Zealand packing list, we’ve provided packing checklists for everything from clothing and toiletries (for both women and men!) to what shoes to pack and extra medicines you may want to have on-hand just in case.
Plus, we’re sharing tons of packing hacks and tips for traveling in New Zealand that you won’t find anywhere else! And it’s completely FREE, so why not!?
Save this article on Pinterest for later!
We want to hear from you!
Would you ever attempt the Tongariro Alpine Crossing in New Zealand? Do you have any more questions about how to prepare? Drop us a comment below and we’ll do our best to get back to you!

Katie Diederichs is the lead writer and co-founder of Two Wandering Soles, where she creates in-depth travel guides, itineraries, and tips designed to help readers plan better trips with confidence. With a background in journalism, photography, and design, she combines thorough research with firsthand experience to deliver clear, practical, and visually driven travel content. As the primary trip planner, Katie turns complex logistics into easy-to-follow advice travelers can actually use.